

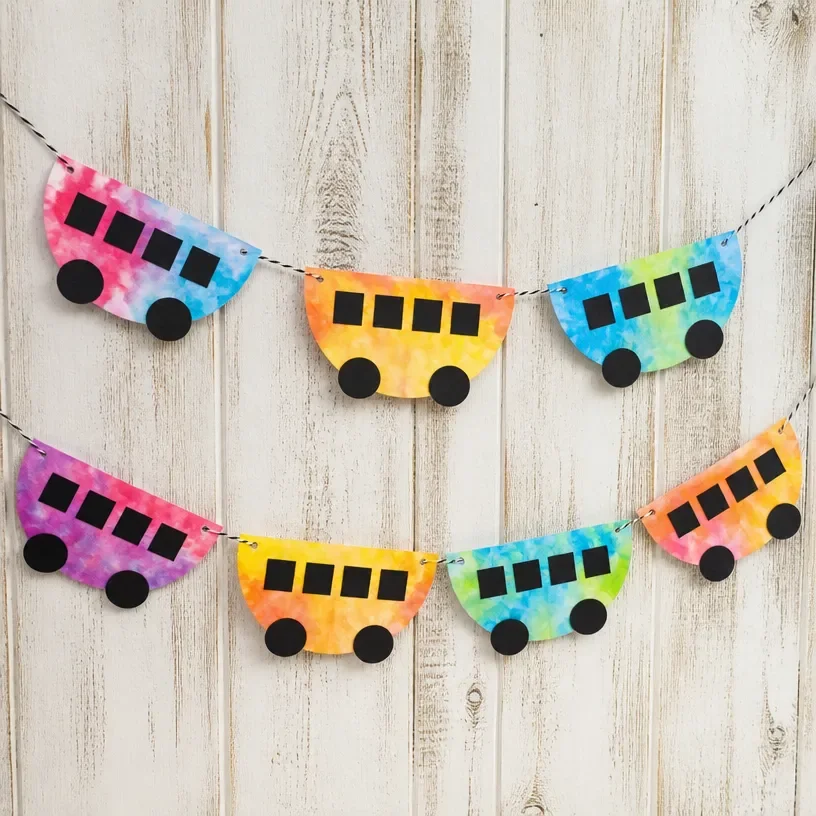
How to Make a Watercolor Coffee Filter School Bus Garland
Creating a vibrant watercolor coffee filter school bus garland is a delightful way to brighten up a space, especially for little ones who love crafts and colorful decorations. This project is not only enjoyable but also serves as a wonderful opportunity for children to express their creativity through painting. You’ll be amazed at how simple materials can transform into an eye-catching piece that brings joyful charm to any setting. You may also find Colorful School Bus Photo Frame Craft For Kids useful.
Why You’ll Love This Project
- Fun for All Ages: This project is suitable for kids and parents alike, providing a perfect bonding experience.
- Supports Creativity: By allowing children to choose their colors and patterns, this craft boosts their imaginative play.
- Easy to Assemble: With just a few steps, you can create a stunning garland without any complicated techniques.
- Inexpensive Materials: You can easily gather the supplies needed for this craft, making it budget-friendly.
- Seasonal Fun: This garland can be adapted for different occasions or decorations around the home.
You may also find Colorful School Bus Organizer Kids Popsicle Sticks useful.
Materials You’ll Need
- Coffee filters
- Watercolor paints or food coloring
- Paintbrushes
- String or twine
- Scissors
- Glue (optional)
- A paper plate or tray for mixing colors
How to Make a Watercolor Coffee Filter School Bus Garland
Prepare Your Workspace: Lay down some newspaper or an old tablecloth to protect your surface from paint spills. You may also find Diy Coffee Filter Tie Dye Butterflies For Garden useful.
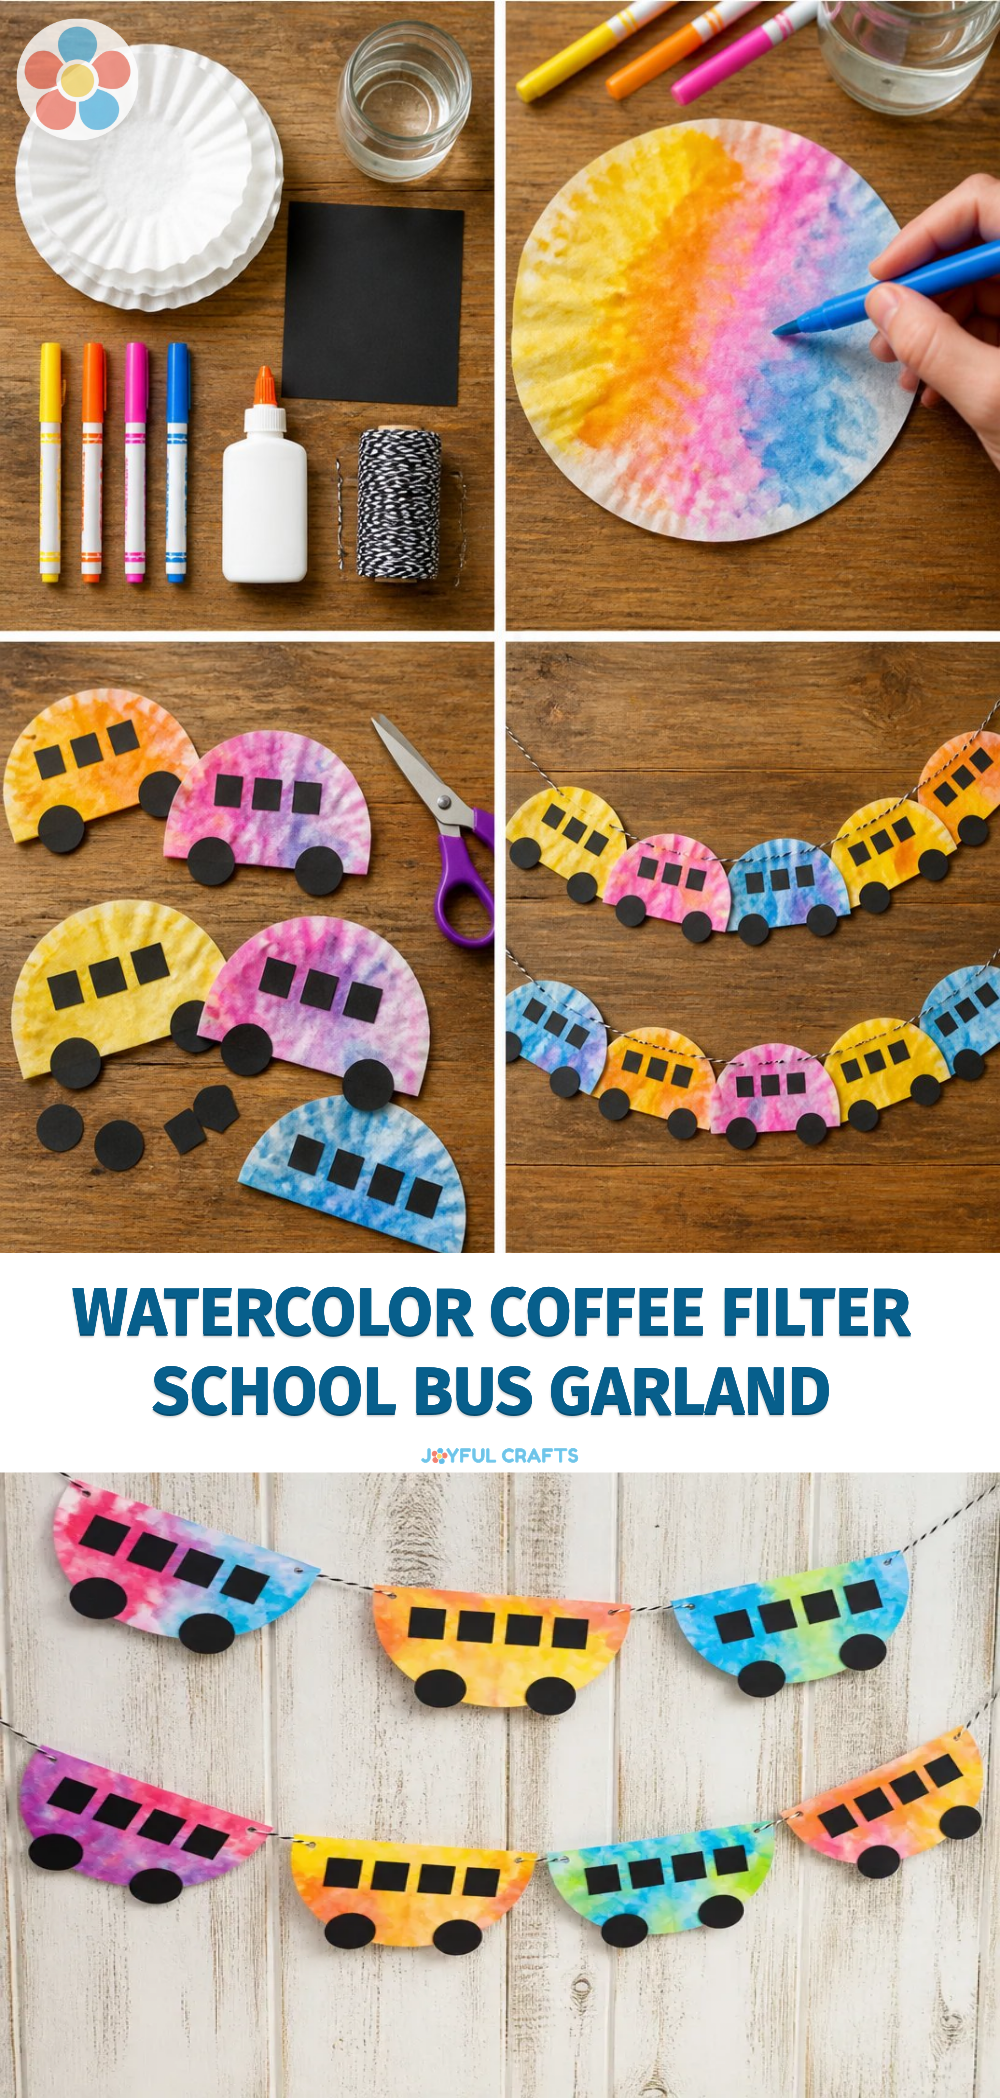
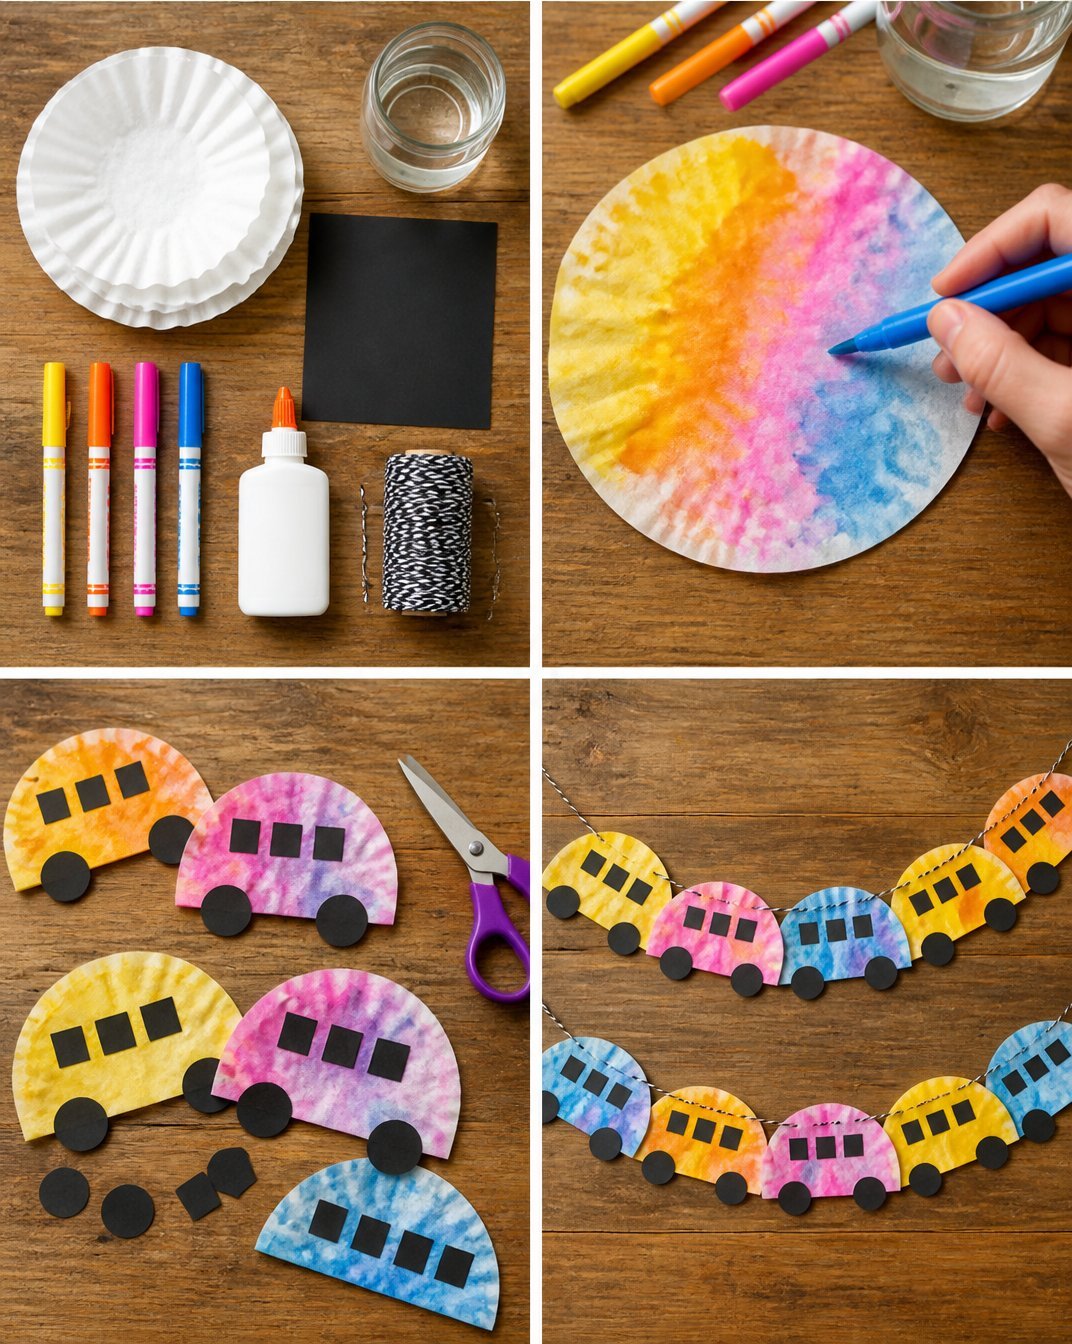
Create Colorful Coffee Filters: Start by placing coffee filters flat on your workspace. Using a paintbrush, apply watercolor paints or diluted food coloring to the filters. You can create various designs try swirling colors or making dots for a fun effect.
Dry the Filters: Once you’re satisfied with the colors, let the coffee filters dry completely. You can speed up the drying process using a hairdryer on a low setting.
Shape the Filters: When dry, fold each coffee filter in half several times until you create a wedge shape. This will help in shaping them into bus forms later.
Cut Out the Bus Shape: Cut the folded coffee filters into the shape of a bus, adding details like wheels or windows if you wish. Open them up to reveal colorful designs.
Assemble the Garland: Take the string or twine and thread it through the bus shapes, spacing them out evenly to create a garland. You can use glue to secure the ends of each bus if needed.
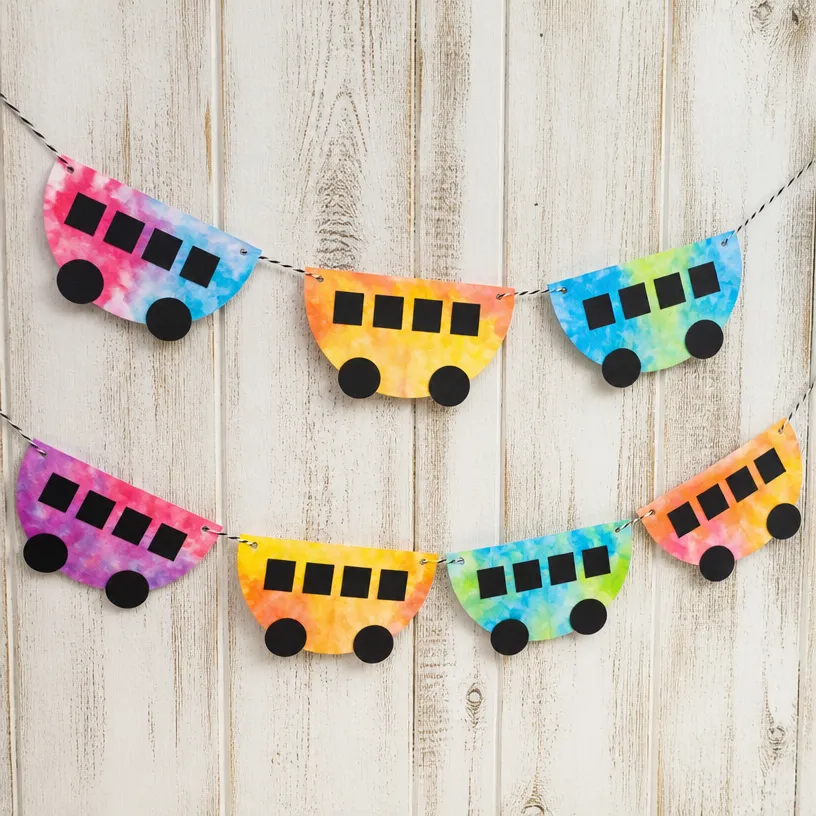
Display Your Garland: Once assembled, hang your beautiful garland in a window, across a wall, or as a cheerful decoration for a party.
Helpful Tips
- Experiment with Colors: Encourage the younger artists to mix colors to discover new shades while painting.
- Set Up a Painting Station: If making this craft with multiple children, set up a painting station so everyone can work simultaneously without waiting.
- Cutting Assistance: If kids are using scissors, supervise them closely to ensure safety. Parents can help with the cutting or complex shapes.
Creative Variations
- Themed Colors: Go with a specific color theme, like winter blues or autumn oranges, to match the season.
- Add Decorations: Tiny stickers or drawings can enhance the buses. Consider using glitter for an extra sparkle!
- Different Shapes: Instead of just buses, why not add other vehicles like cars or trucks to your garland for a fun mix?
Making It With Kids
This craft is designed with kids in mind just remember to supervise any use of scissors or materials that could create a mess. Encourage them to make their designs unique and allow for some creative chaos in the process. As with many crafts, the journey of creating is just as important as the final product!
How to Display, Use, or Gift It
Once your garland is complete, find a joyful spot to hang it where everyone can admire the colorful buses. It makes a lovely decoration for birthday parties, classroom settings, or even family events. This garland can, indeed, be a thoughtful gift for friends or relatives who enjoy handmade items.
Frequently Asked Questions
1. Can I use regular paints instead of watercolors?
Yes, you can use any kind of paint, but be aware that different types may affect the coffee filters differently.
2. How long does it take for the filters to dry?
Depending on the amount of paint used, drying can take anywhere from 30 minutes to a few hours. Using a hairdryer can speed things up.
3. What should I do with leftover filters?
Leftover filters can be used for future crafting projects or even for other creative activities like making flowers. If you’d like more ideas, check out this colorful acorn coffee filter garland for additional inspiration.
4. Is there a way to make this project more eco-friendly?
Absolutely! Consider using natural dyes from fruits or vegetables instead of traditional paint.
5. How can I make the garland longer?
You can simply add more coffee filters shaped like buses or any other decorations you choose to keep it going!
6. What is the best place to hang the garland?
Try hanging it in areas where it can be appreciated above a fireplace, on a wall, or draped across a table for parties.
Conclusion
Creating a watercolor coffee filter school bus garland is a fun and easy project that allows for creativity and personal expression. If you’re looking for more ideas to expand your crafting repertoire, consider checking out the DIY Watercolor Coffee Filter School Bus Garland Tutorial for more inspiration and techniques.
Print
Watercolor Coffee Filter School Bus Garland
- Total Time: 45 minutes
- Makes: 1 garland
Description
A delightful project to create a vibrant watercolor coffee filter school bus garland that brightens up any space.
Materials
- Coffee filters
- Watercolor paints or food coloring
- Paintbrushes
- String or twine
- Scissors
- Glue (optional)
- A paper plate or tray for mixing colors
Instructions
- Prepare Your Workspace: Lay down some newspaper or an old tablecloth to protect your surface from paint spills.
- Create Colorful Coffee Filters: Start by placing coffee filters flat on your workspace. Using a paintbrush, apply watercolor paints or diluted food coloring to the filters.
- Dry the Filters: Once you’re satisfied with the colors, let the coffee filters dry completely.
- Shape the Filters: When dry, fold each coffee filter in half several times until you create a wedge shape.
- Cut Out the Bus Shape: Cut the folded coffee filters into the shape of a bus, adding details like wheels or windows if you wish.
- Assemble the Garland: Take the string or twine and thread it through the bus shapes, spacing them out evenly.
- Display Your Garland: Once assembled, hang your beautiful garland in a window, across a wall, or as a decoration for a party.
Notes
Encourage kids to mix colors and experiment with designs.