


Acrylic Rock Painting on Both Sides
Painting rocks can be a delightful and creative way to express yourself while also creating something beautiful. Acrylic rock painting on both sides allows you to showcase your artistry and create unique decorations for your home or garden. This project is not only enjoyable for kids but also great for crafting with friends or family. You may also find Diy Pinwheel Painting Water Balloons Kids useful.
Why You’ll Love This Project
- Versatile and Fun: You can paint vibrant designs, patterns, or even messages, making these rocks excellent gifts or decorative pieces.
- Simple Materials: The supplies required are easy to find and inexpensive, allowing for a budget-friendly crafting experience.
- Double-Sided Creativity: With the option to paint on both sides, you can create a more dynamic piece that can be viewed from different angles.
- Enhances Fine Motor Skills: This activity is wonderful for improving hand-eye coordination in children as they practice painting their designs.
- Encourages Imagination: Letting your creativity flow can spark ideas for new designs, colors, and themes, similar to other projects like water balloon painting.

You may also find Blue Lagoon Sensory Bottle Calm Relaxation useful.
Materials You’ll Need
- Smooth, clean rocks (make sure they are suitable for painting)
- Acrylic paints in various colors
- Paintbrushes in different sizes
- Water container for rinsing brushes
- Paper towels for drying brushes
- Clear acrylic sealant (optional)
- Palette or plate for mixing colors
How to Make Acrylic Rock Painting on Both Sides
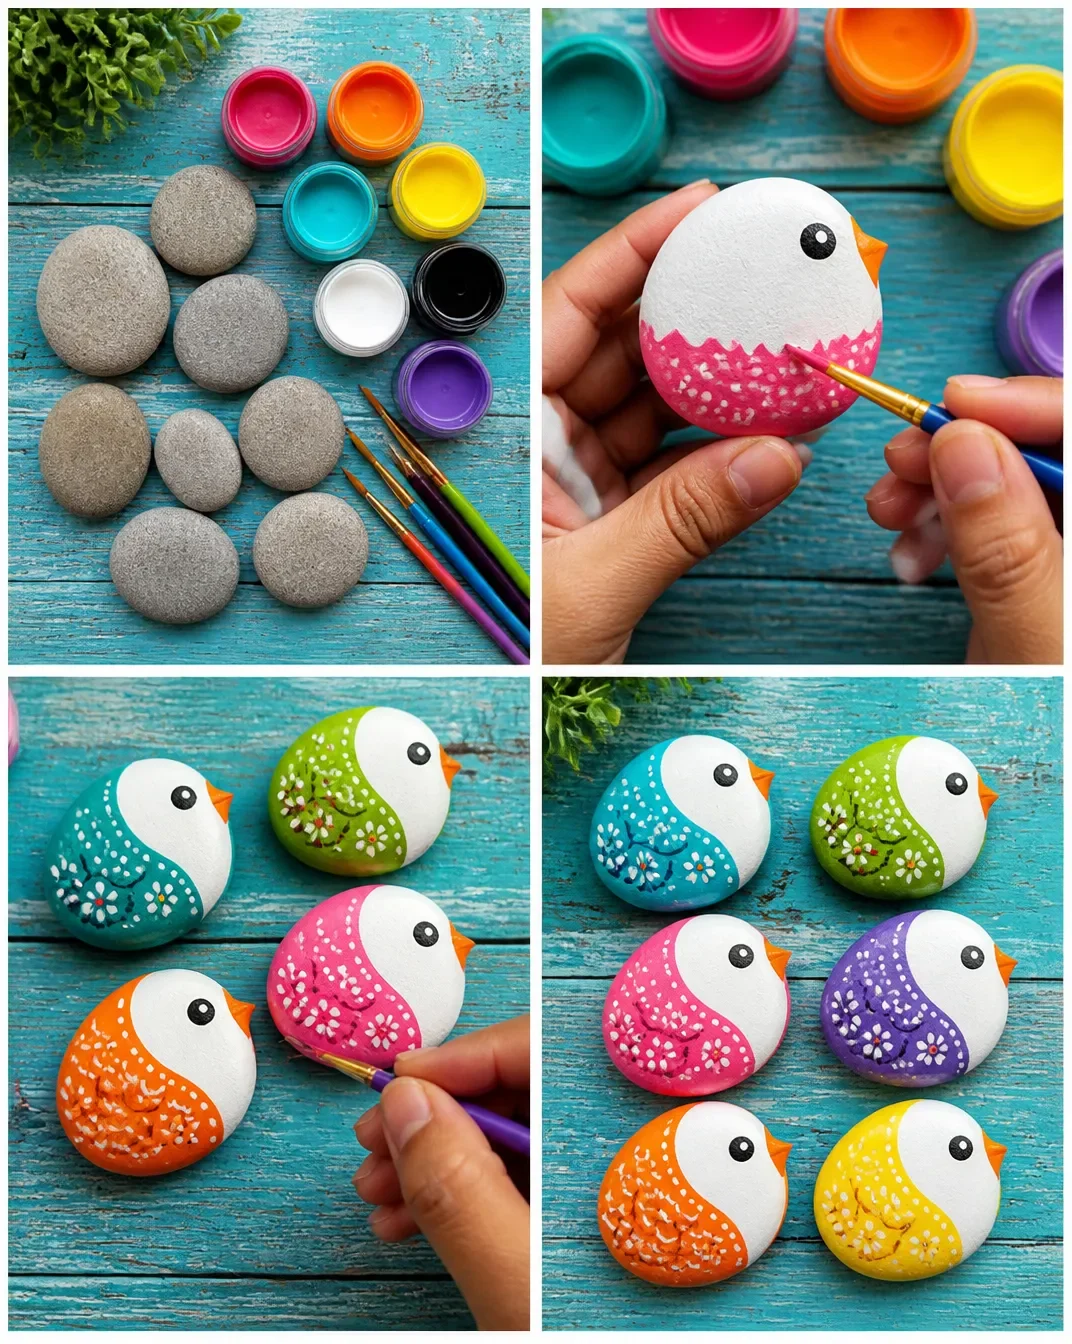
- Prepare Your Workspace: Lay down newspapers or a plastic tablecloth to protect your surface. Ensure you have all your materials at hand.
- Choose Your Rocks: Select smooth rocks that are easy to paint on. Clean them thoroughly and let them dry completely.
- Start Painting: Use your paintbrush to apply the first layer of paint on one side of the rock. Feel free to use a larger brush for expansive areas and a smaller brush for details.
- Let It Dry: Allow the first side to dry completely before flipping the rock to paint the other side. This usually takes about 20-30 minutes, depending on the thickness of the paint.
- Add Details: Once both sides are dry, go back in with smaller brushes to add details or patterns. This is where you can get creative!
- Seal Your Art (Optional): If you’d like to protect your designs from weather conditions, apply a clear acrylic sealant once the paint has dried.
Helpful Tips
- Layering Colors: If you’re using multiple colors, let each layer dry before adding the next to avoid muddying the colors together.
- Mixing Colors: Experiment with mixing colors to create new shades. This can enhance the visual appeal of your painted rocks.
- Graphic Designs: For more intricate designs, consider using stencils, or you can look for inspiration and techniques similar to 3D raised salt painting.
- Using Natural Elements: Incorporate leaves or twigs into your design for a more natural look. You can place them on wet paint for a unique texture.
Creative Variations
- Themed Rocks: Create seasonal designs like pumpkins for fall or flowers for spring.
- Color Schemes: Use a monochromatic color scheme for a modern and stylish look.
- Personalize with Names: Paint names on the rocks for personalized gifts or party favors.
Making It With Kids
Acrylic rock painting is a fantastic activity to do with children. Ensure to supervise when using paints and brushes. It’s a good idea to have baby wipes nearby for quick clean-ups. For younger kids, consider using large rocks and thick brushes to make it easier for them to manage.
How to Display, Use, or Gift It
Once your rocks are painted and dried, they can be used as garden decorations, paperweights, or even thoughtful gifts. You could also host a “painted rock exchange” event with friends and family to share your artistic creations!

Frequently Asked Questions
What type of paint works best for rocks?
Acrylic paint is ideal as it adheres well and comes in a wide variety of colors.
Can I paint using regular watercolors?
Watercolors may not adhere well to the rock surface. Acrylics are recommended for durability.
What should I do if the paint starts to chip?
You can touch up the chipped areas with additional paint or apply a clear sealant to protect your work.
Is there a way to make my designs more long-lasting?
Yes, sealing your painted rocks with a clear acrylic spray or brush-on sealant helps prevent fading and chipping.
Can I use my painted rocks indoors?
Absolutely! They make lovely decorations for indoor spaces too.
What’s a great resource for beginners in rock painting?
For those just starting out, check out this guide on how to paint rocks for helpful tips and techniques to enhance your skills.
Conclusion
Acrylic rock painting is a joyful and fulfilling craft that encourages creativity and personal expression. It’s a fantastic project to do alone or with friends, and the possibilities are endless when it comes to designs. Enjoy creating your unique works of art!
Print
Acrylic Rock Painting on Both Sides
- Total Time: 40 minutes
- Makes: Multiple decorative rocks
Description
A fun and versatile guide for painting rocks on both sides using vibrant acrylic paints to create beautiful decorations.
Materials
- Smooth, clean rocks
- Acrylic paints in various colors
- Paintbrushes in different sizes
- Water container for rinsing brushes
- Paper towels for drying brushes
- Clear acrylic sealant (optional)
- Palette or plate for mixing colors
Instructions
- Prepare your workspace by laying down newspapers or a plastic tablecloth to protect your surface.
- Choose smooth rocks that are easy to paint on and clean them thoroughly.
- Start painting by applying the first layer of paint on one side of the rock.
- Let the first side dry completely before flipping the rock to paint the other side.
- Add details to both sides once they are dry, getting creative with patterns.
- Seal your art with a clear acrylic sealant for added protection if desired.
Notes
Use baby wipes for quick clean-ups when crafting with kids. Consider using larger rocks and thick brushes for younger children.