

Colorful Arch Jewelry Organizer Made from Cardboard
Creating a colorful arch jewelry organizer from cardboard is a delightful project that allows for both creativity and practicality. Not only will this craft help keep your jewelry organized, but it’s a wonderful way to add a splash of color to your space. Plus, using materials you likely already have at home makes it an accessible option for crafters of all ages. Let’s dive into why you’ll love this project! You may also find Colorful School Bus Organizer Kids Popsicle Sticks useful.
Why You’ll Love This Project
- Eco-Friendly Crafting: Using cardboard reduces waste and promotes sustainability while being an affordable crafting option.
- Customization: You can personalize the design to match your style, using various colors and decorations.
- Skill Development: This project develops fine motor skills in children while they learn to cut and assemble.
- Functional Art: The finished product not only serves as a jewelry organizer but can also be a beautiful decorative piece.
You may also find 3D Raised Salt Painting Colorful Artwork For Kids useful.
Materials You’ll Need
- Cardboard pieces
- Glue (liquid glue or a hot glue gun)
- Paint (various colors for decoration)
- Scissors
- Ribbon or string (for hanging options)
- Optional: decorative items like stickers or gems
How to Make Colorful Arch Jewelry Organizer Made from Cardboard
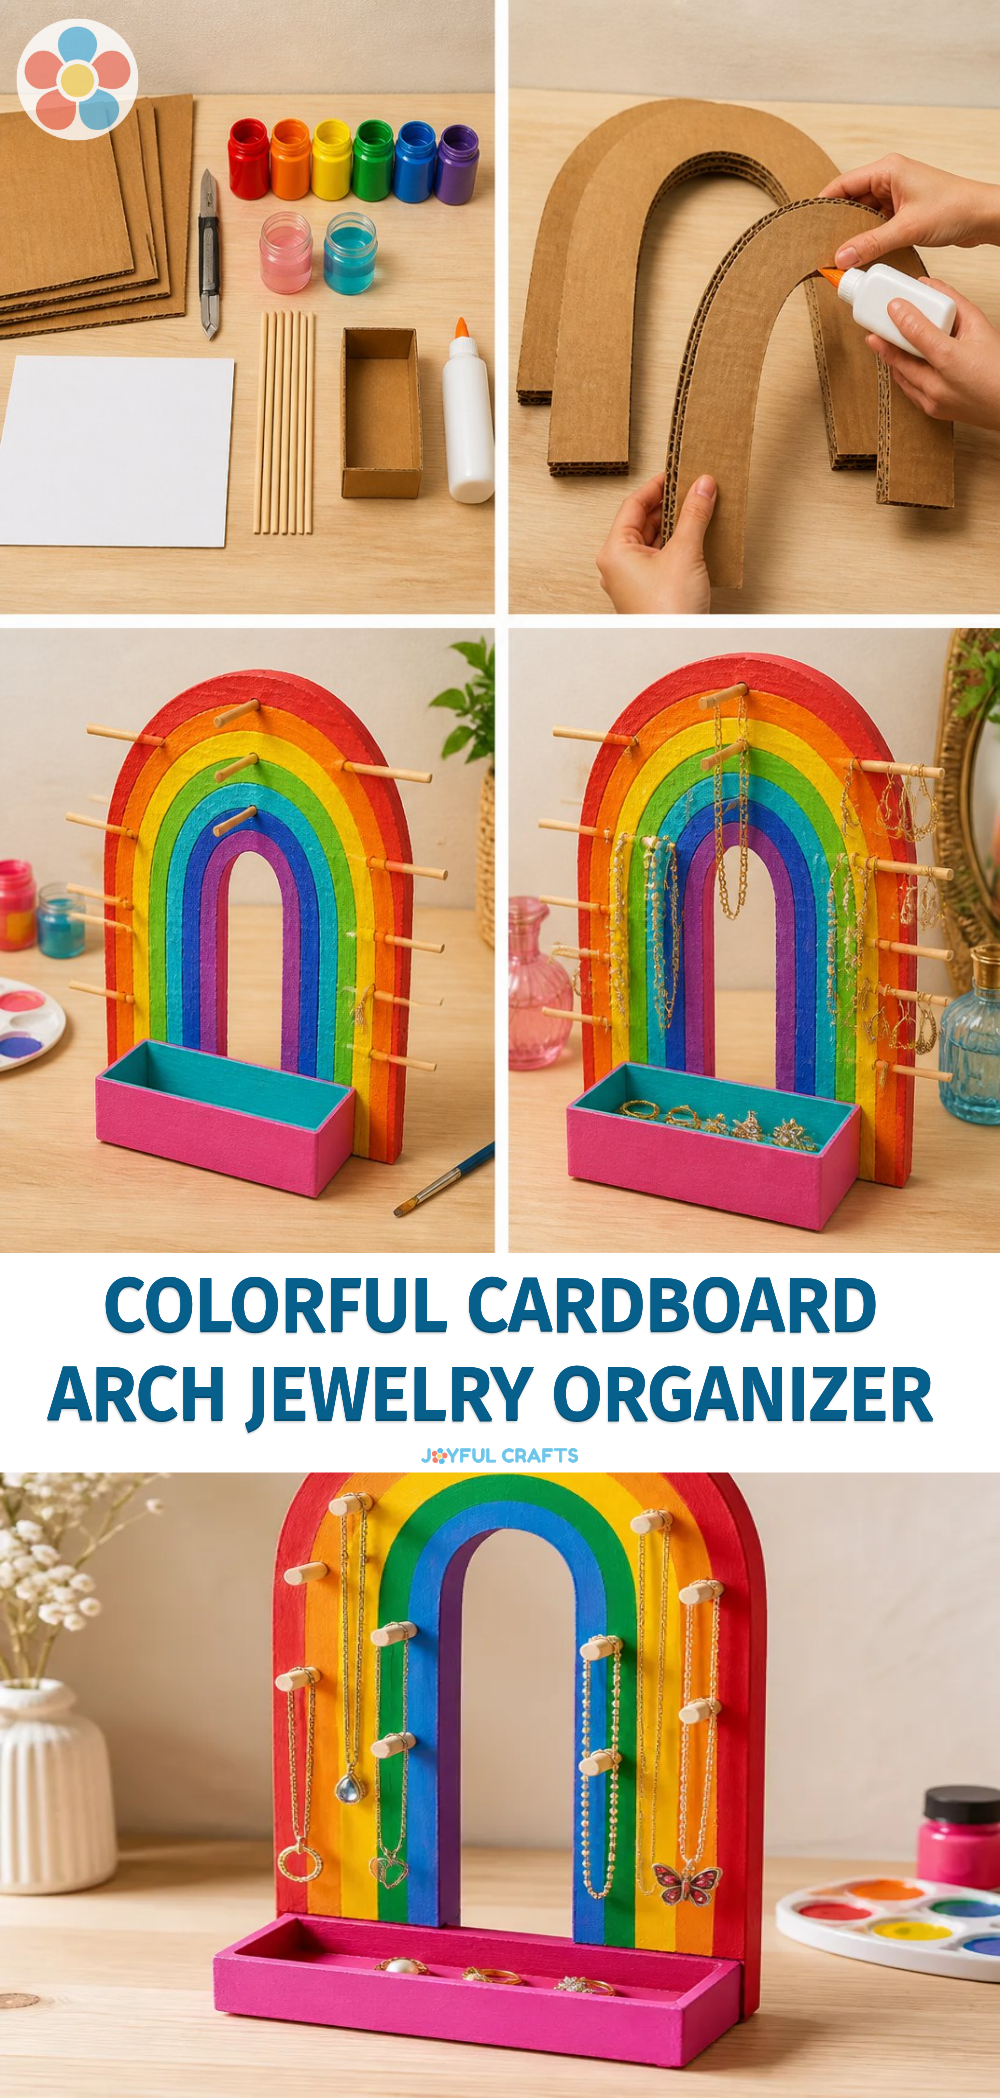
- Prepare the Cardboard: Cut two large pieces of cardboard into an arch shape to form the sides of your organizer. Ensure they’re symmetrical for a balanced look.
- Create the Base: Cut a rectangular piece of cardboard as the base. Attach the arches to each end using glue, ensuring they’re secure.
- Paint the Arches: Choose bright colors of paint and coat the arch shapes. Allow them to dry completely.
- Add Details: Once dried, decorate the organizer with stickers, or paint additional designs to make it more colorful.
- Assemble the Organizer: Attach smaller cardboard strips across the arches for hanging necklaces and bracelets. Let everything dry for a few hours.
- Final Touches: If desired, attach a ribbon or string to the top for hanging, or leave it as a freestanding piece.

Helpful Tips
- When cutting cardboard, take your time to ensure clean edges. A sharp pair of scissors or a craft knife works best for smoother cuts.
- To elevate your design, consider using a mix of colors; try to match your room decor or your jewelry’s colors.
- Allow sufficient drying time for glue and paint to avoid messes.
Creative Variations
- Adapt the size of your organizer to accommodate different types of jewelry, such as larger spaces for chunky necklaces or more sections for rings.
- Use decorative paper or even fabric to cover the cardboard instead of painting for a unique finish.
- Incorporate seasonal themes, such as using pastel colors for spring or warm tones for autumn.
Making It With Kids
This craft is perfect for kids, but be sure to supervise them, especially when using scissors or hot glue. Encourage them to explore their creativity by selecting colors and decorations that resonate with their personality. Making it a collaborative activity will not only make it more fun but also teach them valuable crafting skills. You may also find Bright Colorful Alphabet Garland For Kids useful.
How to Display, Use, or Gift It
The colorful arch jewelry organizer can be displayed on a dresser, bathroom counter, or even as a thoughtful gift for friends and family. Adding a few pieces of jewelry when gifting can make it even more special. You may also find Colorful Alphabet Window Garland For Kids useful.

Frequently Asked Questions
Can I use other materials instead of cardboard?
While cardboard is ideal for its accessibility, you can opt for foam board or wood if you’re looking for a more durable option.
How long will the glue take to dry?
Typically, liquid glue takes about 30 minutes to set, but it’s best to allow 1-2 hours to fully cure.
What types of jewelry can I hang on it?
This organizer is perfect for necklaces, bracelets, and even lightweight earrings.
Can I paint the cardboard before cutting?
Yes, painting large pieces before cutting can give you a unique look, especially with more complex designs.
How can I hang the organizer?
If you’ve added a ribbon or string, you can hang it on a hook or nail. Alternatively, it can simply stand on a flat surface.
Is this project suitable for all ages?
Yes, this project can be adjusted for different age groups. Younger children might need more supervision with cutting tools.
Conclusion
Creating a colorful arch jewelry organizer from cardboard is a delightful way to spark creativity and organize jewelry effectively. If you want to explore more exciting DIY projects, be sure to check out this DIY Rainbow Piñata for a fun twist! Happy crafting!
Print
Colorful Arch Jewelry Organizer Made from Cardboard
- Total Time: 15 minutes
- Makes: 1 jewelry organizer
Description
Create a vibrant and practical jewelry organizer from cardboard, combining sustainability with creativity.
Materials
- Cardboard pieces
- Glue (liquid glue or hot glue gun)
- Paint (various colors for decoration)
- Scissors
- Ribbon or string (for hanging options)
- Optional: Decorative items like stickers or gems
Instructions
- Prepare the cardboard by cutting two large pieces into an arch shape for the sides of your organizer.
- Create the base by cutting a rectangular piece and attaching the arches using glue.
- Paint the arches with bright colors and allow them to dry completely.
- Add details by decorating with stickers or painting additional designs.
- Assemble the organizer by attaching smaller cardboard strips for hanging necklaces and bracelets.
- Final touches include adding a ribbon or string for hanging, or leaving it freestanding.
Notes
Ensure to supervise kids when using scissors or glue. Clean edges can be achieved with sharp scissors or a craft knife.