

DIY Leaf Bagging for Fall Leaves
Creating charming autumn decorations from your leaf collection is both enjoyable and easy! This DIY craft project allows you to transform those colorful fallen leaves into delightful bagged decorations, perfect for your home or yard. It engages your creativity and provides an engaging way to showcase nature’s beauty during the fall season. You may also find Diy Alphabet Window Garland For Kids useful.
Why You’ll Love This Project
- Eco-Friendly: Using collected fallen leaves helps reduce waste while giving you a fun project to complete.
- Fun for All Ages: This craft is simple enough for kids to take part in, making it the perfect family activity.
- Customizable Decor: You can easily personalize your leaf bags with different colors and embellishments to match your home decor.
- Budget-Friendly: All materials are affordable and can often be sourced from what you already have at home or in your yard.

You may also find Diy Bottle Cap Monster Crafts For Kids useful.
Materials You’ll Need
- Clear plastic yard bags
- Collected fallen autumn leaves
- Natural jute twine
- Burlap fabric scrap
- Decorative faux sunflowers
How to Make DIY Leaf Bagging for Fall Leaves
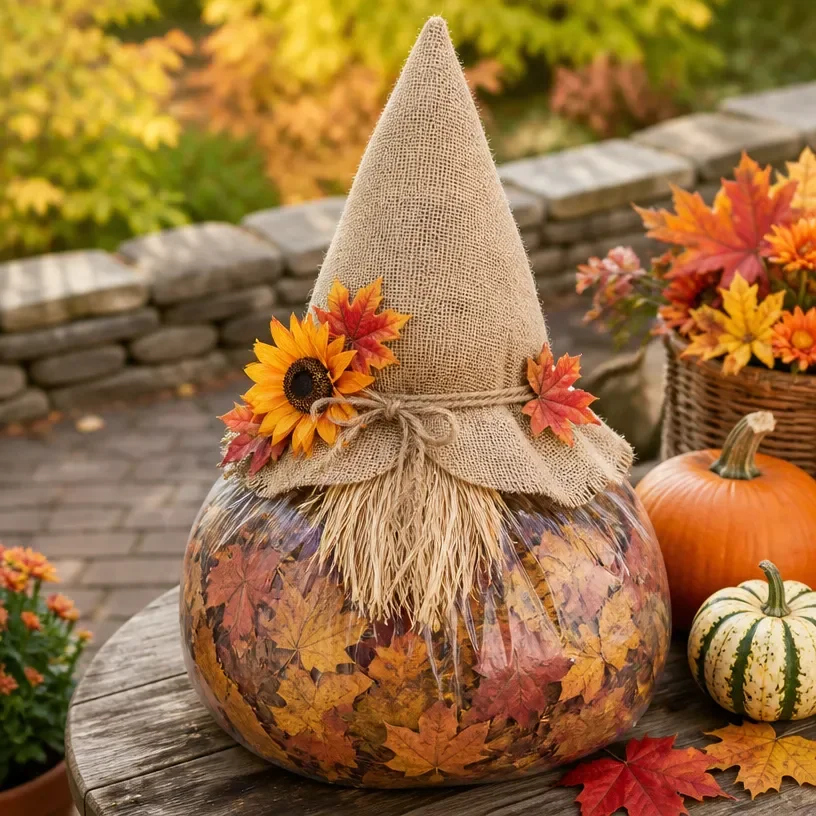
- Fill the Bag: Begin by filling the clear plastic bag with dry autumn leaves until it is fully plump and rounded.
- Secure the Bag: Gather the top of the bag securely and tie it tightly with natural jute twine to shape the body.
- Add a Decorative Collar: Wrap a piece of burlap around the upper section to create a lovely decorative hat or collar for your leaf bag.
- Embellish with Flowers: Finally, secure the autumn floral accents and faux sunflowers around the neck using additional twine to give it a bright and cheerful look.

Helpful Tips
- Choose the Right Leaves: Select colorful leaves that are dry and intact for the best visual appeal.
- Adjust the Size: Depending on your preference, you can use larger yard bags for bigger decorations or smaller bags for a daintier look.
- Work Outside: Completing this project outside can help contain any mess from the leaves and twine.
Creative Variations
- Color Combinations: Use different colored burlap for a unique touch, or paint the twine to match your desired aesthetic.
- Seasonal Themes: Decorate your leaf bags with seasonal accents, like holiday ornaments or winter decorations, for year-round enjoyment.
- Personalized Details: Let kids add their own drawings or stickers to the burlap for a special touch.
Making It With Kids
This project is a wonderful way to involve children. Provide them with the materials and let them dictate how they would like to decorate their leaf bags. Be sure to supervise when handling twine and scissors for the safety of younger crafters. You may also find Diy Coffee Filter Tie Dye Butterflies For Garden useful.
How to Display, Use, or Gift It
Once finished, your leaf bags can be used to decorate your porch, garden, or indoor spaces. They can also make delightful gifts for friends and family who appreciate homemade crafts. Just imagine the smiles when they receive such thoughtful, nature-inspired decorations! You may also find Diy Colorful School Bus Photo Frame Craft For Kids useful.
Frequently Asked Questions
How do I prevent the leaves from getting moldy?
Ensure the leaves are completely dry before adding them to the bags, as moisture can lead to mold.
Can I use other materials for decoration?
Yes! Besides faux flowers, you can also use ribbons, beads, or other craft supplies you have at home.
How do I store the leaf bags after making them?
If you’d like to keep them for future seasons, store them in a cool, dry place away from direct sunlight.
What if I can’t find burlap?
You can substitute burlap with any other fabric like cotton or even paper that adds a decorative touch.
Conclusion
DIY crafts like this leaf bagging project not only brighten up your space but also provide a meaningful way to connect with nature during the fall season. For more creative ideas on using natural materials, explore this guide on 7 Ways To Turn Your Fall Leaf Collection Into Art.
Print
DIY Leaf Bagging for Fall Leaves
- Total Time: 15 minutes
- Makes: As many as you want
Description
Transform colorful fallen leaves into delightful bagged decorations for your home or yard with this fun and engaging craft project.
Materials
- Clear plastic yard bags
- Collected fallen autumn leaves
- Natural jute twine
- Burlap fabric scrap
- Decorative faux sunflowers
Instructions
- Fill the bag with dry autumn leaves until it is fully plump and rounded.
- Secure the top of the bag tightly with natural jute twine to shape the body.
- Add a decorative collar by wrapping burlap around the upper section.
- Embellish with autumn floral accents and faux sunflowers around the neck using additional twine.
Notes
Choose colorful leaves that are dry and intact for best results. This project is safe for kids, but supervision is required when using tools like scissors and twine.