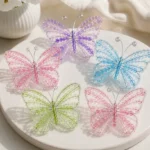
Description
An exciting project for kids and adults to create beautiful butterfly wings, perfect for dress-up or decoration.
Materials
- Tissue paper (various colors)
- Scissors
- Glue or glue stick
- Transparency sheets or plastic folders
- Pipe cleaners (for the antennae)
- Ribbon or string (for hanging)
Instructions
- Prepare the Wings: Start by drawing a butterfly wing shape on the transparency sheet or plastic folder. Cut out two identical wings for each butterfly you plan to make.
- Create the Colorful Design: Lay out tissue paper in small pieces on one side of each transparency wing.
- Secure the Tissue Paper: Apply a thin layer of glue over the tissue paper and allow it to dry for a few minutes.
- Add the Second Wing: Place the second transparency wing on top of the glued side of the first and press down gently.
- Finish the Edges: Use scissors to trim any excess tissue paper from the edges of the wings.
- Create the Antennae: Bend a pipe cleaner into a ‘V’ shape and stick it into the top of the wings.
- Attach String for Hanging: Make a small hole at the top of the wings and thread a piece of ribbon or string through.
Notes
Best for all ages but young children may need supervision with scissors and glue.