

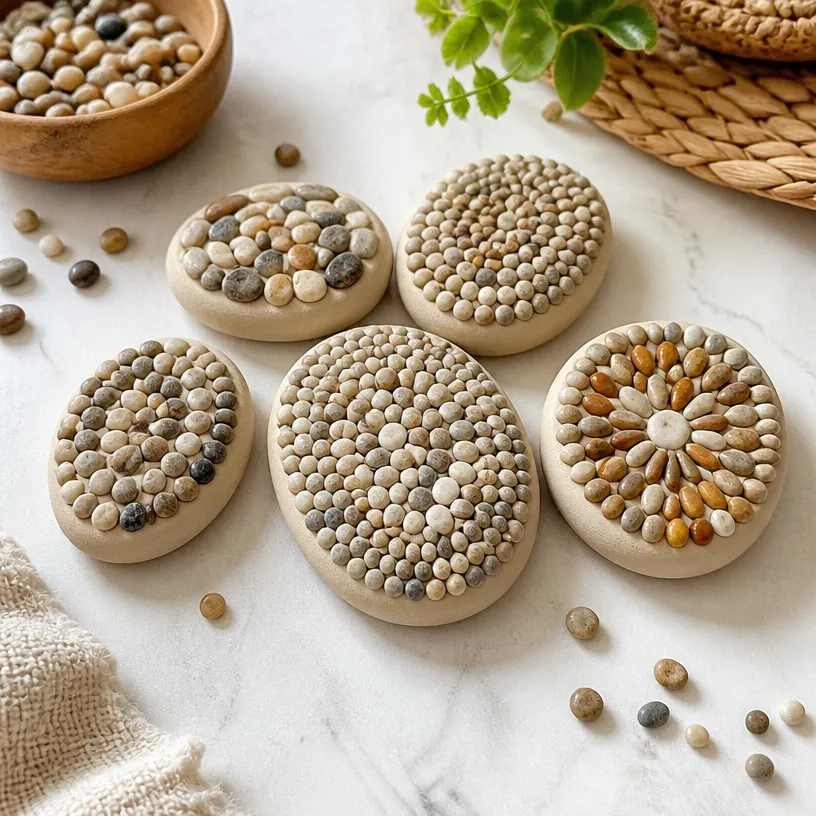
Textured Sensory Picot Stones
Creating textured sensory picot stones is a delightful way to engage with the senses, enhancing tactile exploration for both kids and adults. These colorful, sensory-rich stones can serve as relaxing fidget tools, decorative pieces, or even aids in sensory play. With this simple DIY project, you’ll not only have a great time crafting but also produce sensory materials that are beneficial in many learning and developmental environments. If you’re looking for more sensory experiences, check out this baking soda sensory tray!
Why You’ll Love This Project
- Sensory Development: Engaging with different textures stimulates sensory receptors, beneficial for sensory processing skills.
- Creative Expression: Customize the stones with various colors and patterns to reflect personal creativity.
- Calming Effects: These tactile stones provide a soothing activity perfect for relaxation and focus.
- Educational Tool: Use them during storytelling or playtime to enhance engagement and learning.

You may also find Blue Lagoon Sensory Bottle Calm Relaxation useful.
Materials You’ll Need
- Various colors of air-dry clay or polymer clay
- Textured tools (e.g., sponges, brushes, or fabric)
- A small rolling pin
- Acrylic sealant (if using polymer clay)
How to Make Textured Sensory Picot Stones
Prepare Your Workspace: Start by laying down a clean surface to work on. Gather all your materials to ensure everything is within reach. You may also find Blue Lagoon Sensory Bottle Relaxation useful.
Condition the Clay: If using polymer clay, knead it until it’s soft and pliable. For air-dry clay, ensure it is ready for use as instructed on the package. You may also find Bubble Dough Sensory Play For Kids useful.
Shape the Stones: Roll the clay into small balls, then gently flatten them to form stone shapes.
Add Texture: Use textured tools like sponges or fabric to impress designs onto the surface of the stones. Feel free to experiment with different textures.
Drying: Allow the stones to dry according to the clay type. If you’re using air-dry clay, this may take 24 hours, while polymer clay will need to be baked as per the manufacturer’s instructions.
Seal: Once dry and cool, you may choose to seal your stones with acrylic sealant for added durability, especially if they will be handled frequently.
Helpful Tips
- Work in Batches: If you’re creating multiple stones, consider making them in batches to save time and stay organized.
- Involve Kids: Encourage children to create their own designs by allowing them to customize their stones with paints or beads after the initial drying.
- Mess Management: Place a newspaper or plastic sheet under your workspace to catch any clay crumbs.
Creative Variations
- Color Combinations: Mix different clay colors together to create swirled or marbled effects.
- Seasonal Themes: Decorate the stones according to themes, such as bright colors for summer or earthy tones for autumn.
- Sizes and Shapes: Experiment with various sizes from small pebbles to larger stones.
Making It With Kids
Crafting the textured sensory stones can be a wonderful activity for children, encouraging their creativity and fine motor skills. Parents should supervise young children, especially during any cutting or shaping with tools. It’s essential to ensure all materials used are safe and appropriate for the child’s age group.
How to Display, Use, or Gift It
These sensory stones can be displayed in a decorative bowl or used as playful stress relievers during moments of anxiety. They also make thoughtful gifts for friends or family who would appreciate a handmade sensory tool!

Frequently Asked Questions
1. Can I use other types of clay?
Yes, both air-dry and polymer clay work well for this project. Just follow the specific instructions for the type you choose.
2. How long do the stones last?
If properly made and maintained, textured sensory stones can last a long time, particularly if sealed.
3. Can these stones be painted?
Absolutely! Once dry, you can paint them to add extra color and personal flair.
4. What other activities can I use these for?
They can be used for sensory play, storytelling, or as relaxation tools during mindfulness activities.
5. Are there any safety concerns?
Be cautious with small pieces if younger children are involved. Always supervise their crafting time.
6. What can I do with leftover clay?
Store it properly in an airtight container for later use, or create additional sensory stones!
Conclusion
Creating textured sensory picot stones is not just a fun DIY craft; it serves an essential role in sensory development and creative expression. Consider enhancing your sensory fun with products like the Abilitations Textured Sensory MudBall Fidgets, which can complement your homemade creations!
Print
Textured Sensory Picot Stones
- Total Time: 24 hours
- Makes: Multiple stones
Description
Create colorful and tactile sensory stones for relaxation and sensory play. Perfect for kids and adults alike!
Materials
- Various colors of air-dry clay or polymer clay
- Textured tools (e.g., sponges, brushes, or fabric)
- A small rolling pin
- Acrylic sealant (if using polymer clay)
Instructions
- Prepare your workspace: Start by laying down a clean surface to work on.
- Condition the clay: Knead polymer clay until soft, or prepare air-dry clay as instructed.
- Shape the stones: Roll clay into small balls and flatten them.
- Add texture: Use tools to impress designs onto the stone surfaces.
- Dry the stones: Follow drying instructions specific to the clay type.
- Seal if necessary: Once dry, use acrylic sealant for durability.
Notes
Encourage kids to decorate their stones further after drying. Consider making stones in batches for efficiency.