


Rainbow Salt Painting Jellyfish
Creating a Rainbow Salt Painting Jellyfish is a delightful craft project that combines vivid colors and tactile textures. Suitable for all ages, this project not only encourages artistic expression but also enhances fine motor skills. Gather your materials, and let’s get started on this fun and colorful adventure! You may also find rainbow puppy paw raised-salt painting useful.
Why You’ll Love This Project
- Engaging Process: The combination of glue, salt, and food coloring is a sensory delight that keeps kids engaged.
- Easy to Customize: You can experiment with various colors and designs to make each jellyfish unique.
- Unique Artwork: The final product is a beautiful piece that can be displayed or gifted, bringing joy to recipients.
- Simple Materials: Made from everyday craft supplies, this project is both accessible and affordable.

You may also find magical ocean corner diorama useful.
Materials You’ll Need
- 1/2 cup table salt
- 1/4 cup white school glue
- 2 tablespoons liquid food coloring
- 1 piece of black cardstock paper
- 1 plastic dropper
How to Make Rainbow Salt Painting Jellyfish
- Start by drawing an outline of a jellyfish on the black cardstock using the school glue. This outline will be the base for your salt painting.
- While the glue is still wet, sprinkle a generous layer of salt over the glue drawing, then gently shake off any excess salt. The salt will adhere to the glue and form a nice texture.
- Using the dropper, apply small drops of food coloring onto the salt lines. Watch the colors spread beautifully through the salt, creating a rainbow effect.
- Allow your artwork to dry completely before displaying it or gifting it. This may take a few hours, so be patient.
- Once dry, you can frame the jellyfish or hang it in a window where sunlight can enhance the colors.

Helpful Tips
- When applying the food coloring, start with just a few drops and add more to achieve the desired intensity.
- Ensure the glue is completely dry before attempting to frame or display your jellyfish to avoid any smudging.
- Use an old baking tray to catch excess salt; this makes cleanup much easier.
- If you’re crafting with young children, consider doing the dropping of food coloring step for them to avoid spills.
Creative Variations
- Experiment with different shapes like octopuses or starfish using the same salt painting technique.
- Try adding embellishments like glitter or using scented oils to create a multi-sensory experience.
- Create a series of jellyfish in varying sizes or colors based on seasons, such as bright colors for summer or colder hues for winter.
Making It With Kids
This craft is perfect for collaborating with children, as they can freely express their creativity. For younger kids, make sure to supervise closely, especially during the use of the dropper. This will help avoid any accidents with the food coloring and glue. Encourage them to explore their designs and enjoy the process together! You may also find colorful experiments art project useful.
How to Display, Use, or Gift It
The finished jellyfish artwork can be beautifully framed and hung in a child’s room or given as a gift to family and friends. Consider placing it in sunny spots where the colors can shine and create a lovely visual display. You may also find rainbow watercolor leaf hedgehog useful.

Frequently Asked Questions
1. Can I use other colors of food coloring?
Yes! Feel free to experiment with any food coloring you have on hand to achieve different effects.
2. How long does it take for the jellyfish to dry fully?
Drying times can vary, but typically it should take a few hours. Make sure it’s completely dry before displaying.
3. What can I do if I accidentally spill coloring?
Act quickly by blotting it with a paper towel to avoid permanent stains, and clean it with soap and water afterward.
4. Are there any alternatives to black cardstock?
Definitely! Any dark paper can work, but black gives the best contrast with the colors.
Conclusion
Creating a Rainbow Salt Painting Jellyfish is not just about crafting; it’s about having fun while exploring creativity. For more engaging craft ideas like this one, check out the Salt Painting Jellyfish craft activity guide. Enjoy crafting with your family!
Print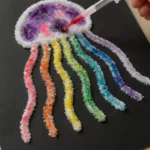
Rainbow Salt Painting Jellyfish
- Total Time: 180 minutes
- Makes: 1 jellyfish artwork
Description
Create a beautiful and unique jellyfish artwork using basic craft supplies and vibrant colors.
Materials
- 1/2 cup table salt
- 1/4 cup white school glue
- 2 tablespoons liquid food coloring
- 1 piece of black cardstock paper
- 1 plastic dropper
Instructions
- Start by drawing an outline of a jellyfish on the black cardstock using the school glue.
- While the glue is still wet, sprinkle a generous layer of salt over the glue drawing, then gently shake off any excess salt.
- Using the dropper, apply small drops of food coloring onto the salt lines and watch the colors spread beautifully.
- Allow your artwork to dry completely before displaying it or gifting it, which may take a few hours.
- Once dry, you can frame the jellyfish or hang it in a window to enhance the colors.
Notes
For younger kids, supervise closely during the use of the dropper to avoid spills.