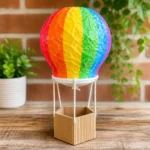
Description
A fun and colorful craft project for kids to create vibrant rainbow tissue paper balloons, perfect for decorating rooms or parties.
Materials
- Tissue paper in various colors (red, orange, yellow, green, blue, indigo, violet)
- Balloon (inflate to desired size)
- Scissors
- Glue
- Small dish or bowl for glue
- Paintbrush (optional)
- Ribbon or string for hanging
Instructions
- Prepare the balloon by inflating it to your desired size and tying it securely.
- Cut the tissue paper into squares or circles, sizing them around 2-3 inches across.
- Apply a thin layer of glue on the surface of the balloon using a paintbrush or your fingers.
- Attach the pieces of tissue paper onto the glued areas, overlapping them for a layered look.
- Finish the balloon by letting it dry for a few hours until the glue sets.
- Deflate the balloon gently and remove it to leave a colorful shell for display.
Notes
For a textured look, consider crinkling the tissue paper before applying. Supervise younger children during cutting and gluing tasks.