


DIY Coffee Filter Flowers Using Magic Markers
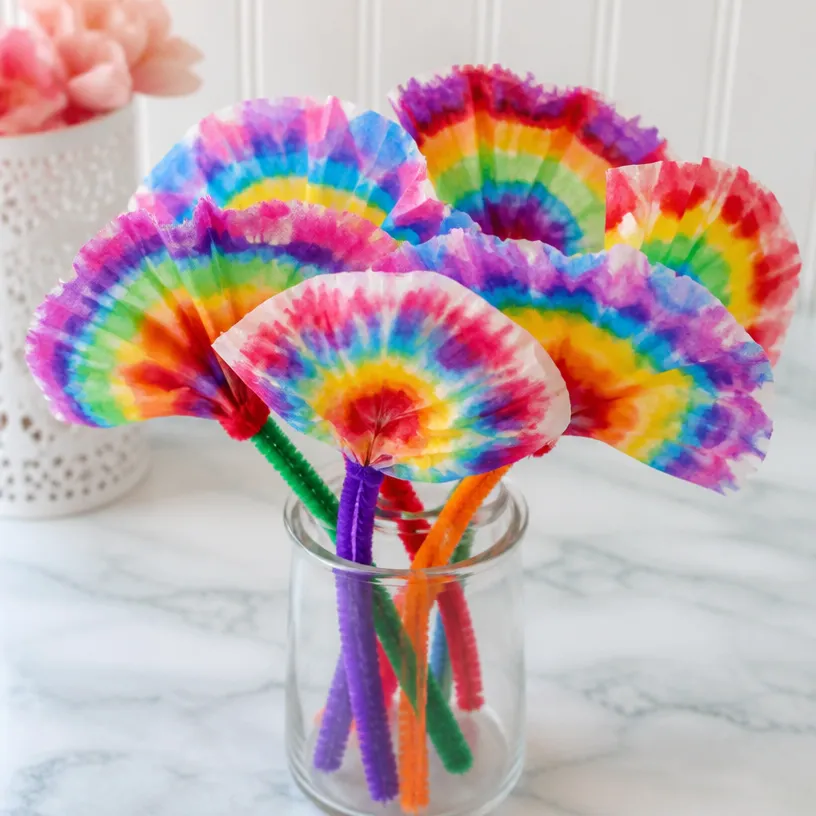
Creating beautiful flowers from coffee filters is a delightful and easy craft that you can enjoy with your family. This project not only allows you to express your creativity but also provides a fun way to decorate your home or gift something special to someone you love. Using just a few materials, you can make colorful flowers that brighten any space and bring a smile to your face. If you love crafts that involve vibrant colors, this project is perfect for you. Don’t forget to check out how to make chroma bleed flowers as well!
Why You’ll Love This Project
- Easy to Make: This project is straightforward and requires minimal materials, making it perfect for all skill levels.
- Customizable: You can use any colors you like, allowing for endless personalization.
- Great for Kids: This craft is suitable for children, encouraging their artistic expression while being a fun bonding experience.
- Decorative Touch: The finished flowers can be used as home decor, given as gifts, or even used for special occasions.

You may also find Diy Coffee Filter Tie Dye Butterflies For Garden useful.
Materials You’ll Need
- Coffee filters
- Magic markers or washable markers
- Water in a spray bottle
- Scissors
- Pipe cleaners or floral wire
- Paper towels for drying
How to Make DIY Coffee Filter Flowers Using Magic Markers
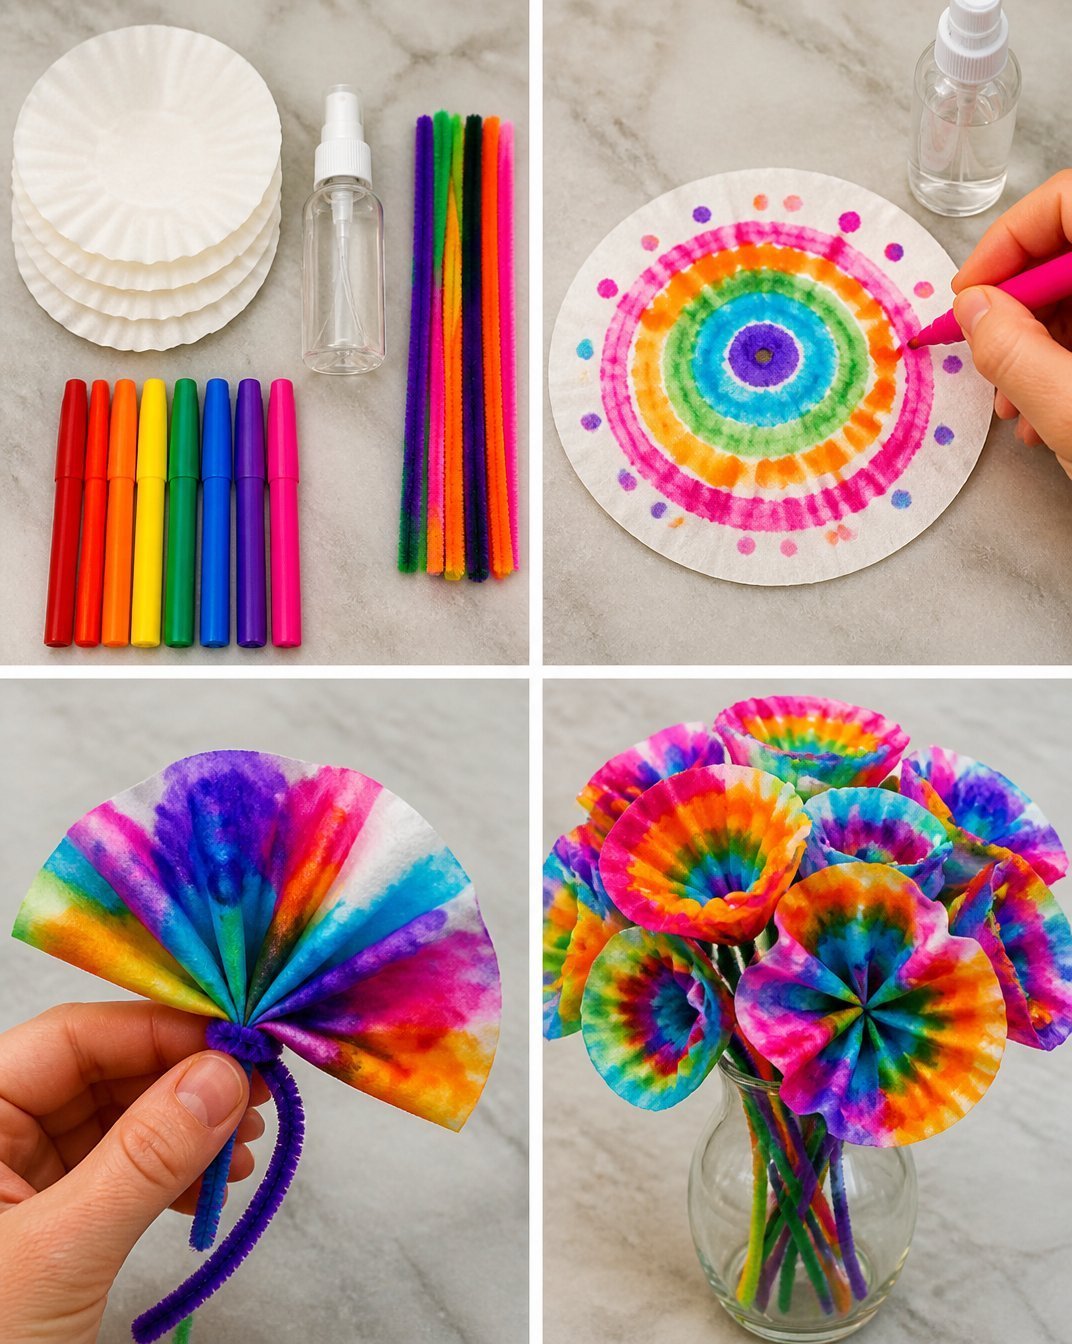
Color the Filters: Start by taking several coffee filters and coloring the top side with your markers. Use bright and vivid colors for the best effect. You may also find Diy Colorful Acorn Coffee Filter Garland useful.
Mist the Filters: Lightly spray the colored filters with water using a spray bottle. Watch how the colors blend and spread together this is what makes the flowers come alive! You may also find Diy Multicolor Coffee Filter Flower Wreath useful.
Dry the Filters: Once you have misted them, lay the filters on paper towels to dry completely. This may take a little time, so be patient!
Create the Flower Shape: Once dry, stack two or three filters together. Use scissors to cut the edges into petal shapes to give your flower a more defined look.
Assemble the Flower: Pinch the center of the stacked filters together and wrap a pipe cleaner around it to secure the petals. This will be the stem of your flower!
Fluff the Petals: Gently pull the layers apart to fluff your flower and give it volume.
Helpful Tips
- Marker Tip: Use washable markers for easy cleanup and to avoid permanent stains on surfaces and clothing.
- Watering Tips: Be careful not to over-spray the filters; a light mist is all you need to achieve the blending effect.
- Display Ideas: Place your finished flowers in a vase, or you can attach them to a gift as a beautiful touch.
- Work Area: It’s a good idea to cover your work surface with newspaper or a cloth to catch any color that might bleed during the process.
Creative Variations
- Different Colors: Experiment with different color combinations; pastels work beautifully for a soft look, while bright colors create a cheerful vibe.
- Add Glitter: After misting, sprinkle some glitter on your flowers before they dry for a touch of sparkle.
- Seasonal Themes: For different seasons, consider using themed colors, like fall tones or spring pastels.
Making It With Kids
This project is an excellent way for kids to explore their creativity. Make sure to supervise children when using scissors, as they will need help cutting the flower shapes. The process of spraying water and coloring can be playful, so be prepared for a little mess, but that’s part of the fun!
How to Display, Use, or Gift It
Once your coffee filter flowers are complete, you can use them to brighten up any space. Consider creating a bouquet to give as a gift or using them as a centerpiece for a special event. You can also place them in a small jar with a note for a thoughtful touch.
Frequently Asked Questions
1. How long do the colors last on the flowers?
The colors tend to last well if kept dry. However, they may fade a bit over time, especially in direct sunlight.
2. Can I use other types of markers?
While magic markers work best for their vibrant colors, you can also try using food coloring or watercolor if you prefer.
3. Is this craft safe for younger children?
Yes! Just supervise them closely while using scissors for cutting and help them with any tricky parts.
4. Can I make these flowers in advance?
Absolutely! Once completed, they can be stored in a cool, dry place for several weeks.
5. What if my colors spread too much?
If the colors spread too much during the wetting process, you can always trim the edges of the filters to create a more defined flower shape.
Conclusion
Crafting DIY coffee filter flowers can be an enjoyable experience for people of all ages. If you want to explore more creative flower-making projects, be sure to check out this easy coffee filter flowers craft for all ages!
Print
DIY Coffee Filter Flowers Using Magic Markers
- Total Time: 10 minutes
- Makes: 4 flowers
Description
Create vibrant coffee filter flowers using magic markers and simple materials. Perfect for all skill levels and great as gifts or home decor.
Materials
- Coffee filters
- Magic markers or washable markers
- Water in a spray bottle
- Scissors
- Pipe cleaners or floral wire
- Paper towels for drying
Instructions
- Color the filters by taking several coffee filters and coloring the top side with your markers.
- Mist the colored filters lightly with water using a spray bottle.
- Dry the filters by laying them on paper towels to dry completely.
- Create the flower shape by stacking two or three filters together and cutting the edges into petal shapes.
- Assemble the flower by pinching the center of the stacked filters and wrapping a pipe cleaner around it.
- Fluff the petals by gently pulling the layers apart to give your flower volume.
Notes
Use washable markers for easy cleanup. Be careful not to over-spray the filters and cover your work surface.