


DIY Rainbow Tissue Paper Balloons: Kids’ Craft Idea
Creating vibrant rainbow tissue paper balloons is a delightful craft that not only sparks creativity but also brightens up any space. Whether for a birthday party, decoration, or just a fun art day, this project is perfect for kids who love to explore their artistic side. Plus, it’s easy and affordable, making it a go-to choice for family craft time. You may also find Rainbow Monster Pencil Holders Diy Craft For Kids useful.
Why You’ll Love This Project
- Ease of Assembly: This craft is simple enough for both children and adults to enjoy together.
- Colorful Displays: The resulting balloons add a burst of color and cheer to any environment.
- Great for Learning: Kids can practice cutting and gluing, useful skills in crafting.
- Versatile: These balloons can be used for various occasions, decorating rooms, or gifting.
- Inspiration for More Crafts: Once your kids master this project, they can move on to other fun crafts like rainbow lanterns or festive decorations.

You may also find Clear Rainbow Ghost Shaker Suncatcher Craft For Kids useful.
Materials You’ll Need
To make your DIY rainbow tissue paper balloons, gather the following materials:
- Tissue paper in various colors (red, orange, yellow, green, blue, indigo, violet)
- Balloon (inflate it to your desired size)
- Scissors
- Glue
- Small dish or bowl for glue
- Paintbrush (optional)
- Ribbon or string for hanging
How to Make DIY Rainbow Tissue Paper Balloons: Kids’ Craft Idea
Follow these simple steps to craft your colorful balloons:
- Prepare the Balloon: Inflate your balloon to your desired size and tie it securely. You may want to use a larger balloon for a more dramatic effect.
- Cut the Tissue Paper: Cut different colors of tissue paper into squares or circles. Size them around 2-3 inches across.
- Apply Glue: Use a paintbrush or your fingers to apply a thin layer of glue on the surface of the balloon.
- Attach Tissue Paper: Stick the pieces of tissue paper onto the glued areas, overlapping them to create a beautiful layered effect. Feel free to mix and match colors!
- Finish the Balloon: Once you have covered the balloon to your satisfaction, let it dry for a few hours until the glue is set.
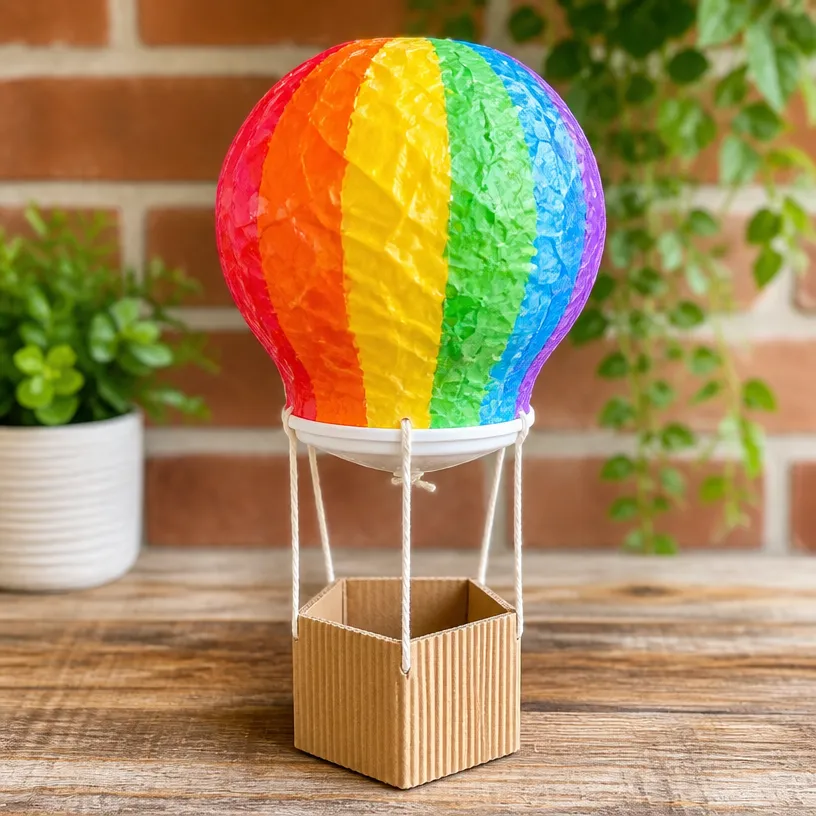
- Deflate and Display: Once dry, gently deflate the balloon and remove it carefully, leaving a colorful shell that resembles a balloon. You can attach a string or ribbon to hang it wherever you like.
Helpful Tips
- For a more textured look, consider crinkling the tissue paper before applying it to the balloon.
- If you’re working with younger kids, they might need assistance with cutting the tissue paper and applying the glue.
- Set up a designated crafting station to minimize mess and make cleanup easier.
- Display your finished balloons by hanging them from the ceiling or on a wall to brighten up your space.
Creative Variations
Encourage your children’s creativity by letting them customize their balloons! Here are a few ideas:
- Pattern Play: Instead of random placement, let kids create specific patterns (like stripes or polka dots) with the tissue paper.
- Seasonal Themes: Use colors that reflect different seasons or holidays, such as pastel colors for spring or warm tones for fall.
- Combine Crafts: After mastering this craft, combine it with other ideas like making flower wheels for a colorful garden theme!
Making It With Kids
This craft is best enjoyed together. Kids can practice safe cutting with scissors and learn how to glue different materials together. Always supervise young children when using scissors or hot glue.
To make it even more fun, consider hosting a small craft party where everyone can make their own rainbow balloons and share their creations!
How to Display, Use, or Gift It
These vibrant balloons can be used to decorate a child’s room, brighten up a birthday party, or even serve as unique gifts for loved ones. You might choose to hang them from the ceiling, attach them to gift bags, or arrange them in a colorful bouquet.

Frequently Asked Questions
1. Can I make these balloons with regular paper instead of tissue paper?
Yes, although tissue paper gives a softer, more delicate look. Regular paper will be sturdier but might not have the same aesthetic appeal.
2. How long will the balloons last once made?
The tissue paper forms a shell that can last for several weeks if stored properly, away from moisture and sunlight.
3. Is this craft suitable for all ages?
Yes, children can enjoy this craft with appropriate adult supervision, especially during cutting and gluing tasks.
4. Can I reuse the balloons?
Unfortunately, once the balloon is deflated and removed, the tissue paper construction is not reusable.
5. What if I don’t have all the colors of tissue paper?
Feel free to use any colors you have on hand, or try creating a monochromatic design with different shades of one color for a stylish twist!
6. How do I clean up after crafting?
Use damp cloths to clean up glue spills and ensure the workspace is orderly, making the task easier for everyone involved.
Conclusion
Crafting DIY rainbow tissue paper balloons is a joyful and fulfilling activity that inspires creativity in children. To spark even more festive ideas for parties, consider exploring this collection of Rainbow Birthday Party Ideas for a vibrant celebration!
Print
DIY Rainbow Tissue Paper Balloons
- Total Time: 15 minutes
- Makes: 4 balloons
Description
A fun and colorful craft project for kids to create vibrant rainbow tissue paper balloons, perfect for decorating rooms or parties.
Materials
- Tissue paper in various colors (red, orange, yellow, green, blue, indigo, violet)
- Balloon (inflate to desired size)
- Scissors
- Glue
- Small dish or bowl for glue
- Paintbrush (optional)
- Ribbon or string for hanging
Instructions
- Prepare the balloon by inflating it to your desired size and tying it securely.
- Cut the tissue paper into squares or circles, sizing them around 2-3 inches across.
- Apply a thin layer of glue on the surface of the balloon using a paintbrush or your fingers.
- Attach the pieces of tissue paper onto the glued areas, overlapping them for a layered look.
- Finish the balloon by letting it dry for a few hours until the glue sets.
- Deflate the balloon gently and remove it to leave a colorful shell for display.
Notes
For a textured look, consider crinkling the tissue paper before applying. Supervise younger children during cutting and gluing tasks.