
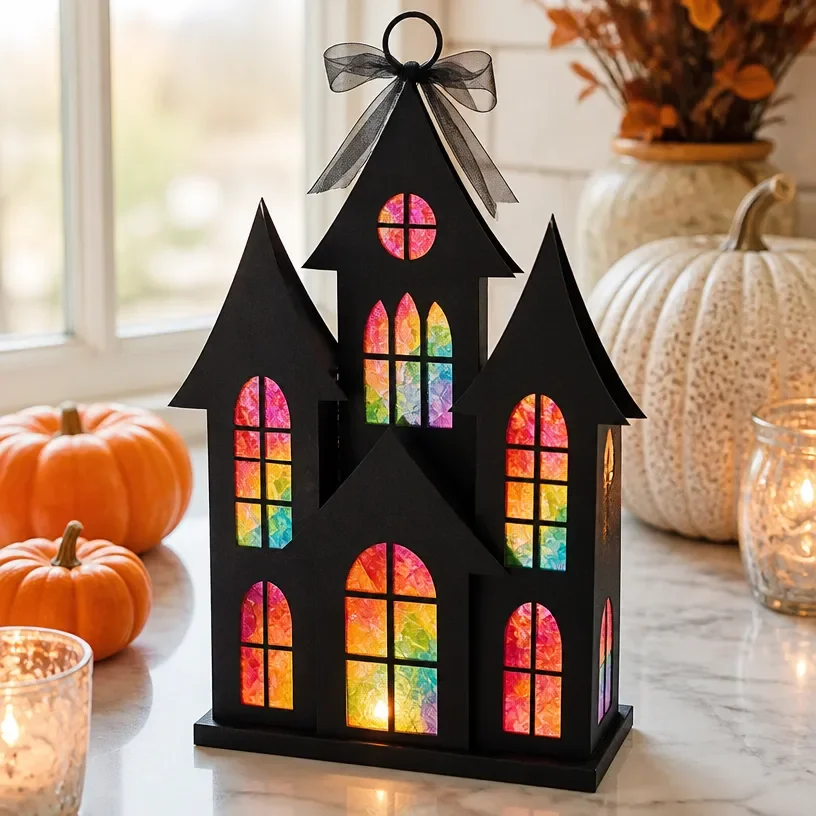
Vibrant Rainbow Crayon Window Art for Haunted House Halloween Decor
Get your home ready for Halloween with this fun and vivid Rainbow Crayon Window Art! It’s a cheerful way to add color and personality to your decor while engaging in a crafty project with loved ones. Plus, it’s an excellent opportunity to repurpose old crayons, allowing creativity to shine in a fun and delightful way. You may also find Melted Crayon Rainbow Butterfly Suncatcher For Kids useful.
Why You’ll Love This Project
- Kid-Friendly Fun: This craft is perfect for children and adults alike! It’s a great project to inspire creativity and teamwork.
- Colorful and Eye-Catching: The melted crayon effect creates a stunning rainbow that looks fantastic when sunlight streams through.
- Simple Materials: You don’t need fancy supplies just crayons, wax paper, and a few household items.
- Thematic Decor: This project is ideal for Halloween, providing an engaging way to complement your spooky decorations. You might also want to check out other related crafts, such as the melted crayon rainbow haunted house suncatcher.

Materials You’ll Need
- Crayons (preferably broken or peeled)
- Wax paper
- Iron
- Parchment paper
- Scissors
- Frame or window for display
How to Make Vibrant Rainbow Crayon Window Art for Haunted House Halloween Decor
- Prepare Your Crayons: Remove the paper from your crayons and break them into smaller pieces.
- Layer the Wax Paper: Cut a piece of wax paper to your desired size. Fold it in half, creating a pouch for your crayon pieces.
- Fill the Pouch: Place a variety of crayon pieces inside the wax paper. You can arrange them by color to create a pattern.
- Ironing the Wax Paper: Place a piece of parchment paper on top of the wax paper pouch, and carefully iron it on low heat. Make sure to move the iron continuously to avoid burning the wax.
- Remove and Cool: Once the crayons have melted and combined, let the wax paper cool before carefully peeling it apart.
- Trim the Edges: Use scissors to cut your new rainbow art into an interesting shape or just keep it rectangular.
- Display Your Art: Frame your window art or stick it directly to your window using tape for a lively Halloween decor piece!

Helpful Tips
- Use Smaller Crayon Pieces: The smaller the crayon pieces, the easier they will melt and blend together.
- Monitor the Iron Temperature: Always use low heat to prevent the wax from burning or creating smoke.
- Protect Your Surface: Lay down an old towel or newspaper on your ironing surface to catch any potential spills from melting wax.
Creative Variations
Feel free to personalize your Rainbow Crayon Window Art! You can experiment with different shapes, use a mix of different colors, or even create themed designs for other occasions. For example, warm colors can create a fiery sunset effect, while cool colors can evoke a calm atmosphere. In addition to this project, you might enjoy making a melted crayon rainbow heart suncatcher for a special touch!
Making It With Kids
This craft is family-friendly and the perfect excuse to get kids involved in the process. Supervise the ironing step, as it requires adult handling. It’s a wonderful way to teach kids about colors and the fun of melting materials. Don’t shy away from letting them get creative with their color combinations! You may also find Rainbow Ghost Cupcake Liner Garland Halloween Decor useful.
How to Display, Use, or Gift It
Once you’ve created your beautiful rainbow art, place it in an area where sunlight can highlight its colors best. You can also gift this artwork to friends or family, presenting it in a simple frame or with a lovely note. For Halloween gatherings, this vibrant piece can become a conversation starter, beautifully enhancing your seasonal setup!

Frequently Asked Questions
1. Can I use any crayon brand?
Yes! While traditional Crayola crayons work well, any brand will do. Just ensure they melt correctly.
2. Is the melted crayon art safe to display in the sun?
Yes, the wax is safe, but prolonged exposure to direct sunlight may cause it to fade over time.3. What’s the best way to clean up crayon wax spills? If any wax spills occur, allow it to cool, then scrape off as much as possible. You can use an iron with parchment paper over it to carefully melt and clean any remaining wax.
4. Can I make smaller versions of this art?
Absolutely! You can adjust the size of both the wax paper and the crayon pieces to create mini art pieces.
5. How long does it take for the melted art to cool completely?
Typically, it takes about 10-15 minutes for the melted crayon art to cool down completely.
Conclusion
Creating vibrant rainbow crayon window art is a delightful activity for families, combining creativity with festive spirit. This Halloween, make sure to add to your creative repertoire by checking out other inspiring crafts, such as Symmetrical Smoosh Haunted House Art for more engaging decoration ideas!
Print
Vibrant Rainbow Crayon Window Art for Haunted House Halloween Decor
- Total Time: 30 minutes
- Makes: 1 window art piece
Description
A fun and vivid craft to create colorful window art using melted crayons, perfect for Halloween decor.
Materials
- Crayons (preferably broken or peeled)
- Wax paper
- Iron
- Parchment paper
- Scissors
- Frame or window for display
Instructions
- Prepare your crayons: Remove the paper from your crayons and break them into smaller pieces.
- Layer the wax paper: Cut a piece of wax paper to your desired size. Fold it in half, creating a pouch for your crayon pieces.
- Fill the pouch: Place a variety of crayon pieces inside the wax paper, arranging them by color to create a pattern.
- Ironing the wax paper: Place a piece of parchment paper on top of the wax paper pouch and carefully iron it on low heat, moving the iron continuously.
- Remove and cool: Let the wax paper cool before carefully peeling it apart.
- Trim the edges: Cut your art into an interesting shape or keep it rectangular.
- Display your art: Frame your window art or tape it directly to your window for Halloween decor!
Notes
Supervise children during the ironing step to ensure safety. Experiment with different colors and shapes for unique designs.